Step-by-Step Outdoor Furniture Plans for Beautiful Outdoor Living
Hey there, fellow outdoor enthusiasts! Are you dreaming of relaxing evenings on your patio, surrounded by beautiful, handcrafted furniture? Forget those overpriced store-bought pieces! Building your own outdoor furniture is more achievable than you think, and incredibly rewarding. This guide will walk you through the process, step-by-step, with plans for a few different projects to get your creative juices flowing.

Choosing Your Project: A Few Ideas to Get You Started
Before we dive into the specifics, let's talk about what you want to build. There are tons of options, each with varying levels of difficulty. To help you choose, here are a few ideas:

A Simple Adirondack Chair:
This classic is a fantastic beginner project. It's relatively straightforward to build, using mostly straight cuts, and requires minimal tools. You'll get a great sense of accomplishment, and it's a timeless piece that will last for years. Plus, Adirondack chairs are super comfy!
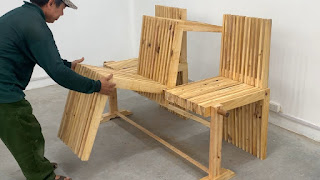
A Sturdy Outdoor Bench:
An outdoor bench is perfect for adding seating to your patio, deck, or garden. You can build a simple bench from pressure-treated lumber, or get more creative with different materials like reclaimed wood or even metal. Building a bench offers a chance to practice some more advanced joinery techniques.
A Charming Picnic Table:
A picnic table is a fantastic centerpiece for any outdoor space. It's a larger project, perfect for a weekend project or spread over a few evenings. This project will allow you to hone your skills with measuring, cutting, and assembling larger pieces. You'll also learn more about using different fasteners.
A Stylish Outdoor Coffee Table:
Want something a bit more refined? An outdoor coffee table is a fantastic addition to any patio setting. You can use a variety of materials, from wood to concrete (for a more modern look). This can involve more intricate cuts and potentially some finishing work.
Essential Tools and Materials
Before you get started, gather your essential tools and materials. The exact list will vary depending on your chosen project, but here's a general overview:
- Measuring Tape: Accuracy is key in woodworking!
- Saw (Circular Saw or Miter Saw): For cutting your lumber to size.
- Drill and Drill Bits: For pre-drilling holes and fastening pieces together.
- Screws or Bolts: Choose outdoor-rated fasteners to withstand the elements.
- Wood Glue: Enhances the strength and durability of your joints.
- Safety Glasses and Hearing Protection: Always prioritize your safety!
- Clamps: To hold pieces together while the glue dries.
- Sandpaper (various grits): For smoothing out rough edges and creating a professional finish.
- Exterior Wood Finish (stain, paint, or sealant): To protect your furniture from the weather.
- Lumber: Pressure-treated lumber is ideal for outdoor furniture, ensuring it can withstand moisture and pests. Choose the appropriate dimensions based on your chosen plan.
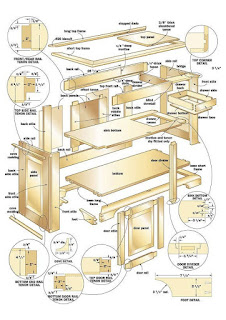
Step-by-Step Guide (Example: Adirondack Chair)
Let's focus on building a simple Adirondack chair. This is a perfect project to start with!
Step 1: Gather your materials and cut the lumber according to your plan.
Find a detailed plan online (plenty of free ones are available!) and carefully measure and cut your lumber accordingly. Accurate cuts are crucial for a sturdy chair.
Step 2: Assemble the chair seat.
Use wood glue and screws to attach the seat slats to the chair's main support pieces. Take your time and make sure everything is aligned properly. Clamps can be really helpful here.
Step 3: Attach the backrest slats.
Next, add the backrest slats, following the pattern indicated in your plan. Again, use wood glue and screws for a strong and secure connection. Make sure the slats are evenly spaced and angled correctly.
Step 4: Attach the legs and supports.
Carefully attach the legs and supporting structures to the seat and backrest. This might involve some slightly more complex joinery, depending on your plan, but take your time and follow the instructions closely.
Step 5: Sand and finish.
Once the chair is assembled, sand all the surfaces smooth, paying close attention to any rough edges. Apply your chosen exterior finish – stain, paint, or sealant – to protect the wood from the elements and give it a beautiful finish. Let it dry completely before use.
Tips for Success
- Start with a simple project: Don't overwhelm yourself! Building an Adirondack chair or a simple bench is a great way to gain experience.
- Read the plans carefully: Understand the instructions completely before you start cutting.
- Measure twice, cut once: This is a classic woodworking adage, and for good reason! Accuracy is key.
- Use quality materials: Invest in good-quality lumber and fasteners for a more durable and longer-lasting piece of furniture.
- Take your time: Rushing the process can lead to mistakes. Enjoy the process and celebrate your progress.
- Don't be afraid to ask for help: If you get stuck, there are plenty of online forums and communities dedicated to woodworking where you can find assistance.
Commonly Asked Questions
Q: What type of wood is best for outdoor furniture?
A: Pressure-treated lumber is a great choice for outdoor furniture because it's resistant to rot, decay, and insects. Cedar and redwood are also popular options, but they are more expensive and require more maintenance.
Q: How do I protect my outdoor furniture from the weather?
A: Applying a high-quality exterior wood finish (stain, paint, or sealant) is essential to protect your furniture from moisture, UV rays, and insects. Reapply the finish every year or two, depending on the product and the climate.
Q: Can I use reclaimed wood for my project?
A: Absolutely! Reclaimed wood can add a unique character to your outdoor furniture. However, make sure to inspect it carefully for any signs of rot or damage before using it.
Q: How long does it take to build a piece of outdoor furniture?
A: This varies greatly depending on the project's complexity and your experience level. A simple Adirondack chair might take a weekend, while a more complex picnic table could take several days or even longer.
Happy building, and enjoy your beautiful new outdoor space!